USB
Luckfox Lume provides one USB 2.0 Type-A Host port and one USB 2.0 Type-C Device port. The Type-A port connects peripherals such as USB flash drives and UVC cameras. The Type-C port provides 5V power input and USB device functionality.
This chapter explains how to mount a USB flash drive and capture photos and video with the IMX415 8MP USB Camera (A).
1. Mounting a USB Flash Drive
1.1 Identifying the USB Flash Drive
Insert the USB flash drive into the Type-A Host port, then check the block devices, filesystem, and kernel log:
root@luckfox:~# lsblk
NAME        MAJ:MIN RM   SIZE RO TYPE MOUNTPOINTS
sda           8:0    1  14.6G  0 disk
`-sda1        8:1    1  14.6G  0 part

root@luckfox:~# blkid /dev/sda1
/dev/sda1: UUID="266D-2C14" BLOCK_SIZE="512" TYPE="vfat" PARTUUID="97917c8f-01"

root@luckfox:~# dmesg | tail -n 30
[ 5208.308091] usb 1-1: USB disconnect, device number 2
[ 5210.481916] usb 1-1: new high-speed USB device number 3 using sunxi-ehci
[ 5210.683053] usb 1-1: New USB device found, idVendor=14cd, idProduct=1212, bcdDevice= 1.00
[ 5210.692222] usb 1-1: New USB device strings: Mfr=1, Product=3, SerialNumber=2
[ 5210.700191] usb 1-1: Product: Mass Storage Device
[ 5210.705494] usb 1-1: Manufacturer: Generic
[ 5210.710070] usb 1-1: SerialNumber: 121220160204
[ 5210.716338] usb-storage 1-1:1.0: USB Mass Storage device detected
/dev/sda: The entire USB flash drive, with a capacity of approximately 14.6 GiB./dev/sda1: A partition identified as FAT32; no formatting is needed.high-speed: A USB 2.0 high-speed connection.- Empty
MOUNTPOINTS: The partition is not mounted.
1.2 Mounting and Verification
Create a mount point and mount the drive read-only to avoid modifying existing files:
root@luckfox:~# mkdir -p /mnt/usb

root@luckfox:~# mount -t vfat -o ro /dev/sda1 /mnt/usb

root@luckfox:~# df -h /mnt/usb
Filesystem                Size      Used Available Use% Mounted on
/dev/sda1                14.6G     96.0K     14.6G   0% /mnt/usb
The output shows that /dev/sda1 has been successfully mounted at /mnt/usb.
1.3 Unmounting the USB Flash Drive
When finished, leave the USB drive directory and close any programs accessing the drive. Then synchronize data and unmount it:
cd /root
sync
umount /mnt/usb
lsblk -o NAME,SIZE,TYPE,FSTYPE,MOUNTPOINTS
Remove the USB flash drive after MOUNTPOINTS for sda1 becomes empty again.
2. USB Camera
2.1 Installing v4l2-ctl
v4l2-ctl is part of v4l-utils. Cross-compile it using the cached v4l-utils 1.22.1 source archive and the 32-bit ARM toolchain included in the Luckfox Lume SDK.
-
Locate the source and toolchain:
cd <Luckfox_Lume_SDK>/ls -lh buildroot/buildroot-202205/dl/libv4l/v4l-utils-1.22.1.tar.bz2ls -l out/toolchain/gcc-linaro-11.3.1-2022.06-x86_64_arm-linux-gnueabihf/bin/arm-linux-gnueabihf-gccRelevant files:
Item Location Source archive buildroot/buildroot-202205/dl/libv4l/v4l-utils-1.22.1.tar.bz2Toolchain directory out/toolchain/gcc-linaro-11.3.1-2022.06-x86_64_arm-linux-gnueabihf/binCompiler prefix arm-linux-gnueabihf-Target system ARMv7, 32-bit hard-float, Buildroot -
Build v4l2-ctl:
cp <Luckfox_Lume_SDK>/buildroot/buildroot-202205/dl/libv4l/v4l-utils-1.22.1.tar.bz2 /tmp/tar -xjf /tmp/v4l-utils-1.22.1.tar.bz2cd /tmp/v4l-utils-1.22.1/./configure \--host=arm-linux-gnueabihf \--disable-shared \--disable-nls \--disable-libdvbv5 \--disable-v4l2-ctl-libv4l \--disable-qv4l2 \--disable-qvidcap \--disable-bpf \--without-jpeg \LDFLAGS="-static-libstdc++ -static-libgcc"make -C utils/v4l2-ctl -j4arm-linux-gnueabihf-strip utils/v4l2-ctl/v4l2-ctl -
Transfer it to the board:
scp /tmp/v4l-utils-1.22.1/utils/v4l2-ctl root@192.168.9.74:/tmp/v4l2-ctlAdd execute permission on the board and check the version:
root@luckfox:~# chmod +x /tmp/v4l2-ctlroot@luckfox:~# /tmp/v4l2-ctl --versionv4l2-ctl 1.22.1
2.2 Installing FFmpeg
-
Download the FFmpeg source:
cd /tmpwget https://ffmpeg.org/releases/ffmpeg-6.1.6.tar.xztar -xf ffmpeg-6.1.6.tar.xzcd ffmpeg-6.1.6 -
Configure a minimal build using the Lume 32-bit ARM toolchain:
export CROSS=<Luckfox_Lume_SDK>/out/toolchain/gcc-linaro-11.3.1-2022.06-x86_64_arm-linux-gnueabihf/bin/arm-linux-gnueabihf-./configure \--enable-cross-compile \--arch=arm \--cpu=cortex-a7 \--target-os=linux \--cross-prefix="$CROSS" \--disable-everything \--disable-autodetect \--disable-doc \--disable-debug \--disable-network \--enable-small \--enable-ffmpeg \--enable-ffprobe \--enable-indev=v4l2 \--enable-protocol=file \--enable-demuxer=mjpeg,avi,mov \--enable-muxer=mjpeg,avi,image2,mov \--enable-parser=mjpeg \--enable-decoder=mjpeg \--enable-encoder=mjpeg \--enable-filter=scale,format,null \--enable-swscale \--enable-avfilter -
Build:
make -j$(nproc)"${CROSS}strip" ffmpeg ffprobefile ffmpeg ffprobels -lh ffmpeg ffprobe -
Copy the binaries to the board:
scp ffmpeg ffprobe root@<IP>:/root/ -
Run on the board:
chmod +x /root/ffmpeg /root/ffprobe/root/ffmpeg -version/root/ffmpeg -hide_banner -devices
2.3 Taking Photos
-
List the camera devices:
root@luckfox:~# ls /dev/video*/dev/video0 /dev/video1root@luckfox:~# v4l2-ctl --list-devicesAllwinner Vin (platform:sunxi-vin-media):/dev/media1USB Camera: USB Camera (usb-sunxi-ehci-1):/dev/video0/dev/video1/dev/media0Check the purpose of each node, pixel formats, resolutions, and frame rates:
v4l2-ctl -d /dev/video0 --infov4l2-ctl -d /dev/video1 --infov4l2-ctl -d /dev/video0 --list-formats-ext/dev/video0listsVideo Captureamong its capabilities and is used for image capture./dev/video1providesMetadata Captureand cannot be used in place of the image capture node. -
Take a photo with the USB camera and save it with the specified filename:
v4l2-ctl -d /dev/video0 \--set-fmt-video=width=1920,height=1080,pixelformat=MJPG \--set-parm=30 \--stream-mmap=2 --stream-skip=10 --stream-count=1 \--stream-to="usb-camera.jpg"The command displays
Frame rate set to 30.000 fpsand capture progress. When complete, it produces a 1920×1080 JPEG file.--set-fmt-video: Select the 1920×1080 resolution and MJPG format.--stream-mmap=2: Use two memory-mapped buffers.--stream-skip=10: Skip the first 10 frames, then save one frame.--stream-to: Save the camera output. A single MJPG frame can be saved directly as JPEG without additional encoding.
2.4 Recording Video
-
Confirm that the camera's image capture node is
/dev/video0and that the MOV muxer is enabled in FFmpeg:/root/ffmpeg -hide_banner -muxers | grep ' mov ' -
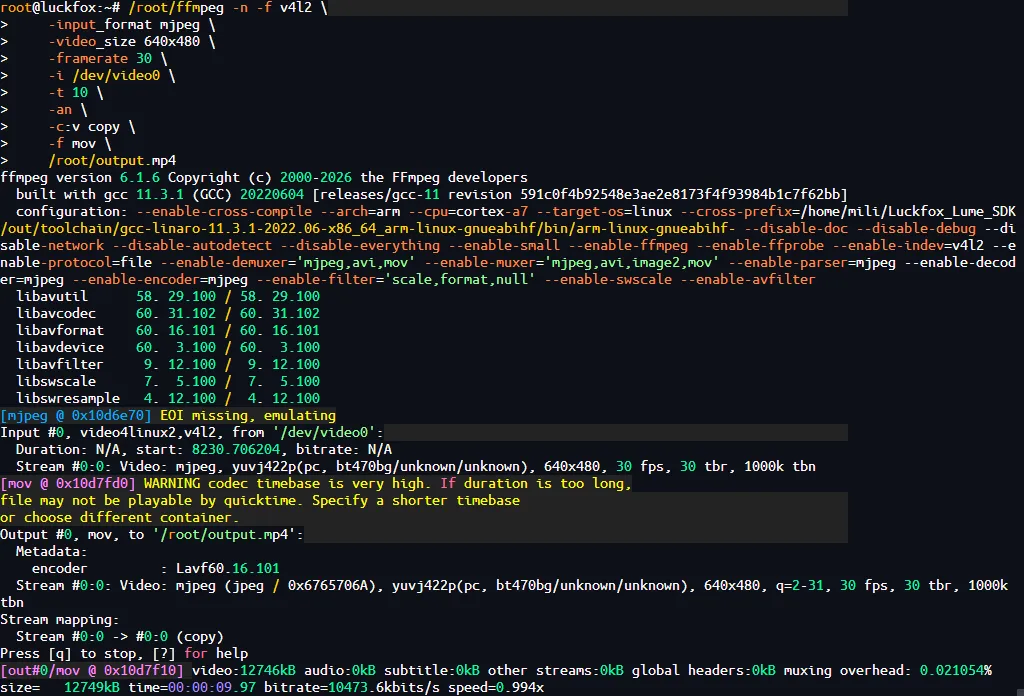
Record a 10-second video at 640×480 and 30 fps using the camera's MJPEG output, and save it directly as an MP4 file:
/root/ffmpeg -n -f v4l2 \-input_format mjpeg \-video_size 640x480 \-framerate 30 \-i /dev/video0 \-t 10 \-an \-c:v copy \-f mov \/root/output.mp4-f v4l2: Capture video from a Linux V4L2 camera.-input_format mjpeg: Use the camera's MJPEG-compressed stream to reduce memory and CPU usage.-video_size 640x480,-framerate 30: Request capture at 640×480 and 30 fps.-t 10: Record for 10 seconds. To stop early, pressCtrl+Cand wait for FFmpeg to finish writing the file trailer.-an: Do not capture audio.-c:v copy: Write the MJPEG video stream directly into the container without re-encoding.-f mov: Explicitly select the MOV/MP4 muxer. This minimal build enables only themovmuxer, so the.mp4extension alone cannot select it automatically. This option is required.-n: Stop if the destination file already exists to avoid overwriting it. Use-yinstead if overwriting is intended.
-
Output:
-
If FFmpeg immediately displays
Killedafter starting, check for an out-of-memory condition:dmesg | grep -Ei 'out of memory|oom-killer|killed process' | tail -n 20grep -E 'MemFree|MemAvailable|SwapTotal' /proc/meminfodu -ak /tmp | sort -n | tail -n 20